
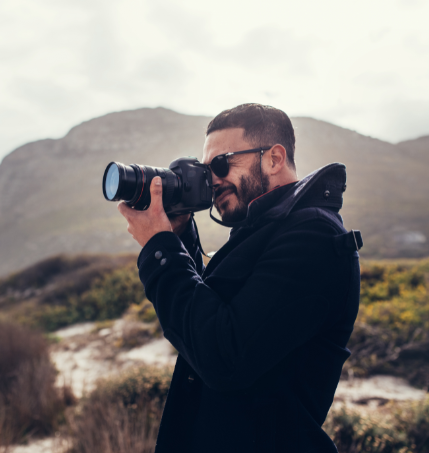
If you want to take your photography to the next level, your Nikon D3200 has a lot to offer. But, it’s easy to get stuck in automatic mode. Let’s change that! In this guide, we’ll unlock your Nikon D3200’s advanced settings. We’ll explore how to take full control of your camera to capture stunning photos and videos. Ready to dive in? Let’s go!
Mason knows photography inside and out. With 15 years of hands-on experience, he’s written about cameras, lenses, and gear of all kinds. He even spent five years as a journalist, diving deep into music and writing sharp, engaging stories. Now, Mason shares his photography knowledge, helping readers find the right gear and perfect their skills. He’s also proud of his unbeatable Wordle streak!
1. Getting Started with Your Nikon D3200
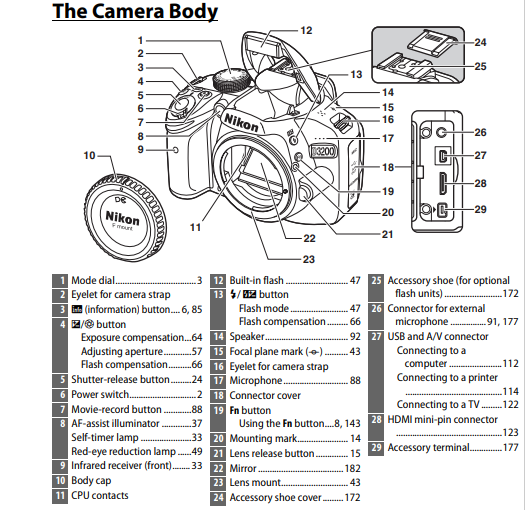
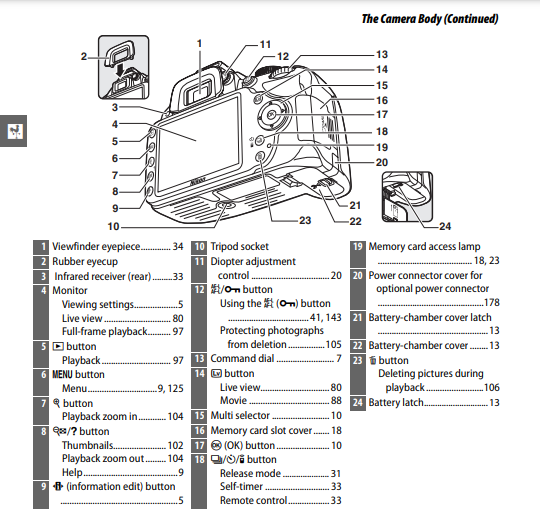
When you first hold your Nikon D3200, it can feel overwhelming with all the buttons and settings. But don’t worry. Once you get to know the basics, you’ll see how fun and easy it is to use.
Turn the Camera On: Push the power button. The screen will light up, showing the basic settings like ISO, shutter speed, and aperture. But we need to go further.
Switch to Manual Mode: To unlock the advanced settings, turn the mode dial to “M.” This is where you can fully control every setting. Manual mode is your key to creativity!
2. Mastering Exposure: Shutter Speed, Aperture, and ISO
Your camera’s exposure controls are the first step in taking great photos. These settings determine how light or dark your picture is. Here’s how they work:
Shutter Speed: This is how long your camera’s shutter stays open. A fast shutter speed (like 1/500) freezes motion. A slower shutter speed (like 1/30) lets in more light, but may blur fast-moving objects. Try experimenting with both!
Aperture: Aperture controls how much light enters your camera. A low number (like f/2.8) gives a blurry background and bright image, while a high number (like f/16) keeps everything sharp but less bright. Use a lower f-number for portraits and a higher one for landscapes.
ISO: ISO controls the camera’s sensitivity to light. A low ISO (like 100) is best for bright places. A high ISO (like 3200) is good for dark scenes but can add noise (grain) to your picture. Stick to lower ISOs when you can, and raise them when it’s too dark.
3. Autofocus Modes: How to Get Sharp Pictures
Getting sharp photos is crucial, and your Nikon D3200 makes it easy with its autofocus modes. The two main modes are:
AF-S (Single Autofocus): Use AF-S when your subject is still. It locks the focus and holds it there. Press the shutter halfway to focus, then shoot.
AF-C (Continuous Autofocus): If your subject moves, use AF-C. It keeps refocusing while the subject moves, so you don’t miss the shot.
4. White Balance: Make Colors Look Natural
White balance adjusts how warm or cool your photos look. If your photos seem too yellow or blue, adjusting the white balance can fix that.
- Auto White Balance (AWB): This works for most situations. But, for more control:
- Incandescent Light: Use this setting indoors under yellow light to make colors look more natural.
- Daylight: This is perfect for shooting outdoors on sunny days.
- Cloudy: If the sky is overcast, this will warm up your shots.
Experiment with these settings to get the best look for your photos.
5. The Power of Manual Focus
Sometimes, autofocus just won’t cut it. For tricky shots, switch to manual focus. Turn the focus ring on the lens to adjust it until your subject is sharp. This gives you full control when autofocus struggles.
6. Using Different Picture Styles
Your Nikon D3200 offers different picture styles to help create the right mood for your images. These styles affect the color, contrast, and sharpness of your photos.
- Standard: Good for everyday shots.
- Portrait: Softens skin tones for flattering portraits.
- Landscape: Enhances blues and greens, perfect for nature shots.
- Monochrome: Turns your photos into black and white, for a classic look.
Play around with these styles to find the one that best suits your shot.
7. Setting the Exposure Compensation
Sometimes, even with manual settings, you might need a little help with exposure. That’s where exposure compensation comes in. It lets you brighten or darken the image without changing all the settings.
How to Adjust: Turn the dial or press the exposure button to increase or decrease brightness. A positive number (+) brightens the image, and a negative number (-) darkens it. This is handy when shooting scenes with high contrast, like snow or bright skies.
8. Using the Interval Timer for Time-Lapse Photography
The Nikon D3200 has a built-in interval timer, making it easy to create time-lapse videos. Set it to take photos at regular intervals, then stitch them together to make a video. It’s a fun way to capture slow-moving scenes, like sunsets or clouds.
How to Set It: Go to the menu, select “Interval Timer Shooting,” and set the time between shots. Then press the shutter button, and your camera will take photos automatically!
9. Taking Control of Flash Settings
While natural light is great, sometimes you need a flash to light up your subject. The D3200 gives you control over how the flash works.
Built-In Flash: Press the flash button to pop it up. You can use it for portraits in low light or to fill in shadows.
Flash Compensation: Adjust the flash output with flash compensation. Increase it if you need more light or decrease it for a softer effect.
10. Exploring Video Settings: Capture Stunning Footage
Your Nikon D3200 isn’t just a photo camera—it’s also a great tool for capturing video. Let’s explore its video settings:
Resolution: Set the camera to record in 1080p for sharp video quality. You can adjust the frame rate (24fps for a movie-like look, 60fps for smoother motion).
Manual Control: Just like with photos, you can control exposure while shooting video. Adjust shutter speed, aperture, and ISO to get the perfect shot.
Focus During Video: Switch to AF-C (continuous autofocus) if you want the camera to keep refocusing while you record. For more control, switch to manual focus.
11. Saving Your Settings with Custom Banks
If you find a set of settings you like, you can save them for future use. The Nikon D3200 allows you to create custom banks. Save your best settings under “My Menu” for easy access.
How to Save Settings: Go to the menu and select “Save User Settings.” Choose a slot and name it. Now, whenever you want to use those settings, just load your custom bank.
12. Using Live View for Better Framing
Live view allows you to see exactly what your camera sees on the screen. This is great for composing shots, especially when using a tripod. To use live view:
Activate Live View: Press the LV button on your camera. Now, you can see your scene in real-time.
Use it for Macro Shots: Live view is perfect for close-up shots where you need to see details clearly.
Conclusion: Unlock Your Creativity with the Nikon D3200
Your Nikon D3200 is packed with features that give you full control over your photography. By learning how to use the advanced settings, you can create stunning images and videos that truly reflect your vision.
Start experimenting with manual settings like shutter speed, aperture, and ISO. Don’t be afraid to switch off auto mode and explore the camera’s capabilities. Whether you’re capturing fast action, stunning landscapes, or beautiful portraits, the Nikon D3200 has everything you need to take your photography to the next level.
So, what are you waiting for? Grab your camera, unlock those advanced settings, and start capturing unforgettable moments today!